
Introduction
Nail art has evolved from simple manicures to a vibrant canvas for self-expression, with French nail art leading the charge in popularity. Originally characterized by its classic white tips on a nude base, the French manicure has transformed over the years, embracing a plethora of colors, designs, and techniques. As we step into spring—a season synonymous with rejuvenation and creativity—there’s no better time to explore the beauty of spring-inspired French nail art. The blooming flowers and fresh colors of this season provide an ideal backdrop for personalizing your nails with unique designs that reflect your personality.
Spring invites us to break free from the mundane and experiment with new ideas, making it the perfect opportunity for you to unleash your inner artist. By incorporating themes inspired by the season, you can create visually stunning French nail art that captivates and delights. Whether you’re a seasoned nail artist or a beginner, this guide will encourage you to explore your creativity and try out some DIY designs that celebrate the essence of spring.
“Creating a cozy reading nook is all about maximizing comfort in a small space. It’s about intentional design that serves both function and feeling.”
– Interior Design Magazine
Understanding the Basics of French Nail Art
French nail art is a timeless style that highlights the elegance of manicured nails with a striking contrast between the tip and the base. Traditionally, this look features a nude or pale pink base with white tips, creating a clean and sophisticated appearance. In recent years, however, the definition of French manicure has expanded significantly, allowing for the incorporation of various colors, patterns, and embellishments.
To embark on your French nail art journey, you’ll need a few essential tools and materials. These include a base coat, nail polish in your chosen colors, a top coat for durability, and tools like a fine brush or nail art pen for precision. A good quality nail file and cuticle pusher will also help you achieve a polished look. Understanding the impact of different base colors is crucial; for example, a light pink base offers a soft, romantic feel while a bold color can make a statement.
When it comes to nail shape, consider what best suits your fingers and style. Classic oval or almond shapes are popular for French tips, but feel free to experiment with square or stiletto shapes for a modern twist. The right nail shape can enhance the overall design, helping you achieve a unique look that’s distinctly yours.
Spring Color Palette Inspiration
Spring is a symphony of colors, bursting with pastels, floral hues, and vibrant shades that awaken our senses. Popular choices for spring-inspired nail art include soft pinks, mint greens, baby blues, and lavender shades. These colors evoke the freshness of new blooms and the renewal of nature. You can also incorporate bolder colors, such as coral or sunny yellow, for a more eye-catching effect.
Mixing and matching these colors can lead to stunning designs. For instance, a soft lavender base adorned with bright floral accents can create a delightful contrast. Additionally, consider incorporating seasonal trends, such as neon or metallics, which can add a playful edge to your spring nail art. A bright neon green tip on a nude base can evoke the energy of springtime, while metallic gold or silver can add a touch of elegance.
When choosing your color palette, think about what reflects your personal style. Are you drawn to soft, muted tones, or do you prefer bold and vibrant colors? Your palette can tell a story, so take the time to select shades that resonate with you and capture the spirit of spring.
Essential Tools for Creating DIY French Nail Art
Creating beautiful French nail art at home requires a few essential tools that can elevate your designs. Here’s a list of must-have supplies:
| Tool | Purpose |
|---|---|
| Base Coat | Protects nails and enhances polish longevity. |
| Nail Polish | Color for base and tips. |
| Top Coat | Seals design and adds shine. |
| Nail Art Brush | For detailed designs and precision. |
| Dotting Tool | For creating dots and floral patterns. |
In addition to these primary tools, proper nail care tools, such as files and cuticle pushers, are crucial for preparing your nails. Healthy nails provide a better canvas for your art and ensure that your designs look their best. Keeping your tools organized is also essential; consider using a dedicated nail art case or container to prevent misplacement and ensure easy access to your supplies.
Step-by-Step Guide to Classic French Nail Art
Achieving the classic French tip look is straightforward with the right techniques. Here’s a step-by-step guide to help you create this timeless design:
1. Prep Your Nails: Start by cleaning and shaping your nails. Push back your cuticles and file your nails to your desired shape. Apply a base coat to protect your nails.
2. Apply Base Color: Choose your base color and apply one or two coats, allowing adequate drying time between layers. A nude or soft pink color works well for a classic look.
3. Create the Smile Line: Once your base is completely dry, it’s time to create the French tips. You can use nail tape for crisp lines or freehand the tips with a fine nail art brush. For freehanding, dip your brush in white polish and carefully paint a curved line across the tips of your nails, following the natural curve of your nail’s edge.
4. Add a Top Coat: After the tips have dried, apply a top coat to seal your design and add a glossy finish. This will not only enhance the look but also help your nails stay chip-free longer.
5. Customization: Consider customizing your classic French tips by adding small dots, glitter, or even a different color for the tips. This personalization can make your design uniquely yours.
Creative Spring-Themed Variations
Once you’ve mastered the classic French nail art design, it’s time to get creative with spring-themed variations that reflect the beauty of the season. Here are some ideas to inspire you:
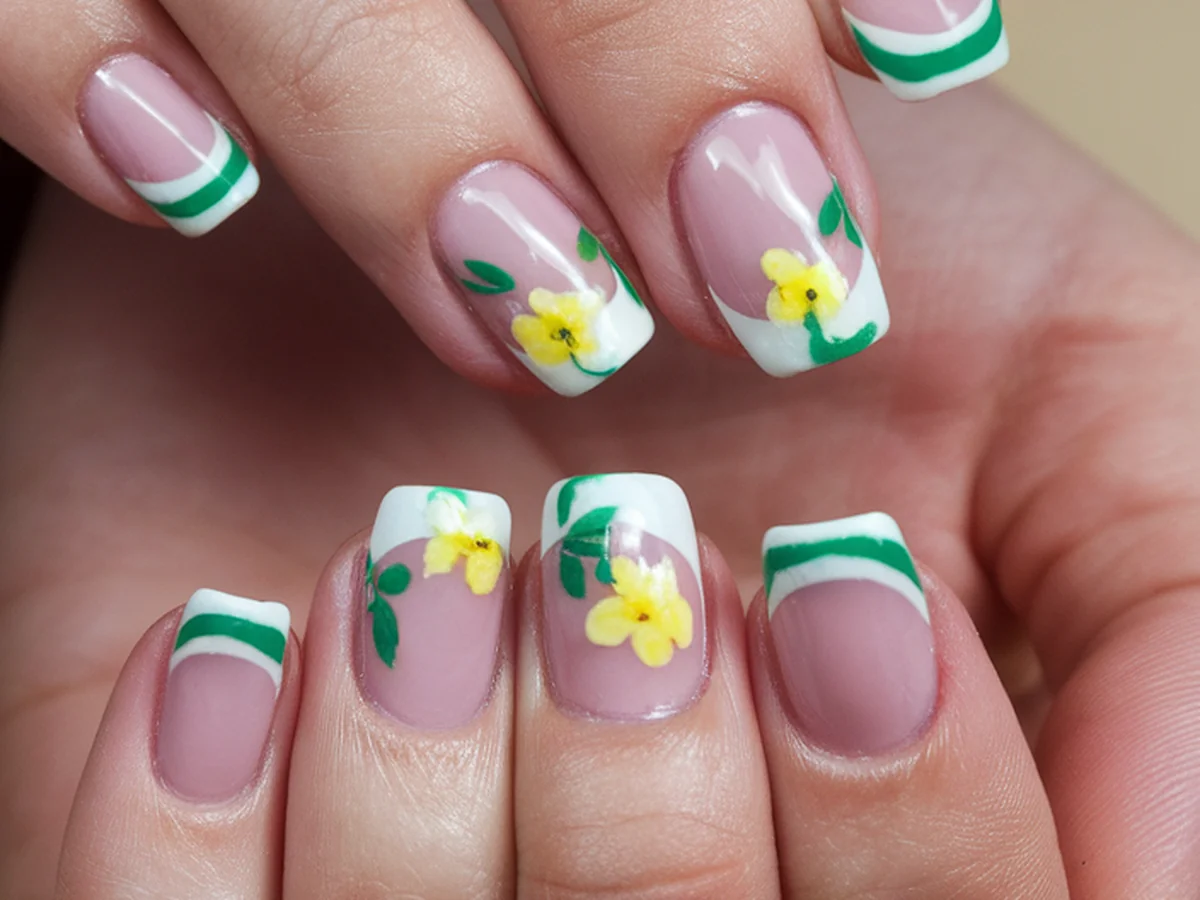
– Floral Designs: Incorporate spring flowers such as daisies or cherry blossoms into your nail art. You can create tiny flowers on the tips or scatter them across your nails with a dotting tool. Use soft colors like pink, yellow, and white for a delicate look.
– Geometric Patterns: Draw inspiration from the geometric shapes found in nature during spring, such as petals and leaves. You can use nail tape to create crisp lines and patterns, adding a modern twist to your French tips.
– Gradients and Ombre: For a fresh twist, try using gradient or ombre techniques to blend colors seamlessly. A soft pink transitioning into a pale yellow at the tips can evoke the beauty of a spring sunrise.
– Embellishments: Consider adding rhinestones, glitter, or metallic accents to elevate your designs. A few well-placed rhinestones on the tips or a touch of glitter on the base can add a touch of glamour to your spring nail art.
Nail Art Techniques to Enhance Your Designs
To take your spring nail art to the next level, consider incorporating various nail art techniques that can enhance your designs. Here are some popular methods:
– Nail Stamping: This technique allows you to transfer intricate designs onto your nails easily. Invest in a nail stamping kit, which includes plates with various designs, a stamper, and a scraper. It’s a fun way to achieve detailed patterns without the need for freehand painting.
– Sponging: This technique is perfect for creating gradients or textures. Use a makeup sponge to dab different colors onto your nails, blending them for a beautiful ombre effect. It’s ideal for colorful spring designs.
– Nail Tape: Nail tape is a fantastic tool for creating sharp lines and geometric designs. Apply the tape to your nails before painting, and once dry, remove it to reveal clean lines.
– Freehand Painting: If you’re feeling adventurous, try freehand painting for more intricate designs. Use a fine brush to create delicate flowers or patterns directly on your nails. Practice makes perfect, so don’t hesitate to experiment.
– Layering Techniques: For added depth and complexity, consider layering different techniques. For instance, you could create a gradient base and then stamp a floral pattern over it for a stunning visual effect.
Caring for Your Spring Nail Art
Proper nail care is essential for maintaining the beauty of your spring nail art. Here are some tips for ensuring your designs last:
– Pre- and Post-Care: Before applying nail art, ensure your nails are clean and healthy. After your design is complete, apply a high-quality top coat to protect against chips and enhance shine.
– Maintenance: To prolong the life of your nail art, reapply top coat every few days. This will help prevent chipping and maintain the glossy finish. Be mindful of activities that may damage your nails, such as excessive exposure to water or harsh chemicals.
– Fixing Issues: If you notice chipping or peeling, you can easily fix minor issues by applying a touch of nail polish to the affected area and sealing it with a top coat. For larger problems, you may need to remove and redo the design.
– Seasonal Refresh: As the seasons change, consider refreshing your nail art to reflect new trends or colors. It’s a great way to keep your look fresh and exciting.
Showcasing Your Nail Art: Photography and Sharing
Once you’ve created your stunning spring nail art, you’ll likely want to share it with the world! Here are some tips for capturing great photos and engaging with the nail art community:
– Photography Tips: Find good lighting when taking photos of your nails. Natural light works best, so consider shooting near a window. Use a plain background to keep the focus on your nails, and experiment with different angles to find the most flattering shots.
– Sharing on Social Media: Platforms like Instagram and Pinterest are perfect for showcasing your nail art. Use relevant hashtags like #NailArt, #SpringNails, or #FrenchManicure to reach a broader audience. Engage with others by liking and commenting on their posts, fostering a sense of community.
– Engaging with Communities: Join online nail art communities or forums where you can share your designs, seek advice, and participate in challenges. Engaging with like-minded individuals can inspire you and provide valuable feedback on your work.
– Inspiring Others: Don’t hesitate to share your techniques and tutorials. Whether through written posts, videos, or step-by-step guides, your creativity can inspire others to explore their nail art adventures.
Conclusion
Creating spring-inspired French nail art is a fulfilling and enjoyable way to express your creativity. The joy of customizing your nails with seasonal themes not only allows for personal expression but also enhances your mood and confidence. Remember, the beauty of DIY nail art lies in experimentation—don’t be afraid to try out new colors, techniques, and designs.
As you embark on this creative journey, we encourage you to share your unique designs with the world, inspiring others to embrace their creativity as well. Dive into the vibrant colors and whimsical patterns that spring offers, and let your nails reflect the beauty of this rejuvenating season. So grab your tools, unleash your creativity, and let the world see your stunning spring-inspired French nail art!
Frequently Asked Questions
What are the best colors for spring nail art?
Spring nail art often features a palette of soft pastels, vibrant floral hues, and fresh, bright colors. Popular choices include shades like baby pink, lavender, mint green, and sunny yellow. You can also experiment with bolder colors like coral or turquoise for a vibrant twist. Ultimately, choose colors that resonate with your personal style and reflect the beauty of the season.
How long does nail art typically last?
The longevity of nail art can vary based on several factors, including the quality of products used, your daily activities, and how well you care for your nails. Generally, a well-applied manicure with a quality top coat can last anywhere from 5 to 10 days before you may start to notice chipping or wear. Regular maintenance, such as reapplying top coat and avoiding harsh chemicals, can help extend its lifespan.
Can I do French nail art on short nails?
Absolutely! French nail art can be stunning on short nails. The key is to choose the right nail shape and design that complements your nail length. You can opt for a classic rounded tip or even experiment with square shapes. Additionally, consider using thinner lines for the tips to maintain a balanced look that enhances the elegance of short nails.
Do I need special tools for nail art?
While some nail art techniques can be done with basic tools, investing in a few specialized tools can greatly enhance your designs. Essential tools include a fine brush for detailed work, dotting tools for creating patterns, and nail tape for clean lines. Additionally, high-quality nail polishes and top coats are crucial for achieving a professional finish.
How can I prevent my nail art from chipping?
To prevent chipping, start with a good base coat to protect your nails, followed by quality nail polish and a durable top coat. Avoid exposing your nails to excessive water or harsh chemicals, and consider wearing gloves when doing chores. Regularly reapply top coat every few days to maintain the shine and integrity of your designs.