
Introduction
Spring is a season that brings with it a sense of renewal and creativity. As the flowers bloom and the days grow longer, many of us feel inspired to embrace the vibrancy of the outdoors. This season is not just about enjoying the beauty around us; it’s also an opportunity to express ourselves through various forms of art, including the delightful world of DIY nail art. The trend of creating your own nail designs at home has gained immense popularity, allowing individuals to celebrate the essence of spring without breaking the bank.
Engaging in DIY nail art is not only a fun way to express your creativity but also comes with a myriad of benefits. You have the ability to customize your designs to suit your personality and style, and the process of painting can be incredibly therapeutic. Whether you’re a seasoned nail artist or a beginner, creating your own nail art can be a rewarding experience, tapping into your artistic side while celebrating the beauty of this vibrant season.
“Creating a cozy reading nook is all about maximizing comfort in a small space. It’s about intentional design that serves both function and feeling.”
– Interior Design Magazine
Essential Tools and Supplies for DIY Nail Art
Before diving into your nail art journey, it’s crucial to gather the right tools and supplies. Having the essentials on hand can make the process smoother and more enjoyable. Here’s a list of basic nail care tools you’ll need:
| Tool | Purpose | Recommendation |
|---|---|---|
| Nail clippers | To trim nails to your desired length | Opt for stainless steel for durability |
| Nail file | To shape and smooth edges | Choose a fine grit for a polished finish |
| Cuticle pusher | To gently push back cuticles | A metal or wooden pusher works well |
In addition to these tools, selecting the right nail polish colors is essential for achieving that springtime vibe. Look for pastel shades like soft pink, mint green, and baby blue, as well as vibrant floral colors like coral and lavender. These hues perfectly reflect the refreshing spirit of spring.
To create stunning nail art, consider adding a few extra supplies to your toolkit:
- Dotting tools for intricate designs
- Nail tape for creating clean lines
- Sponges for ombre effects
Don’t forget the importance of using a good base coat to protect your nails and a top coat to seal your designs and enhance their longevity. This simple step can make all the difference in ensuring your hard work lasts longer.
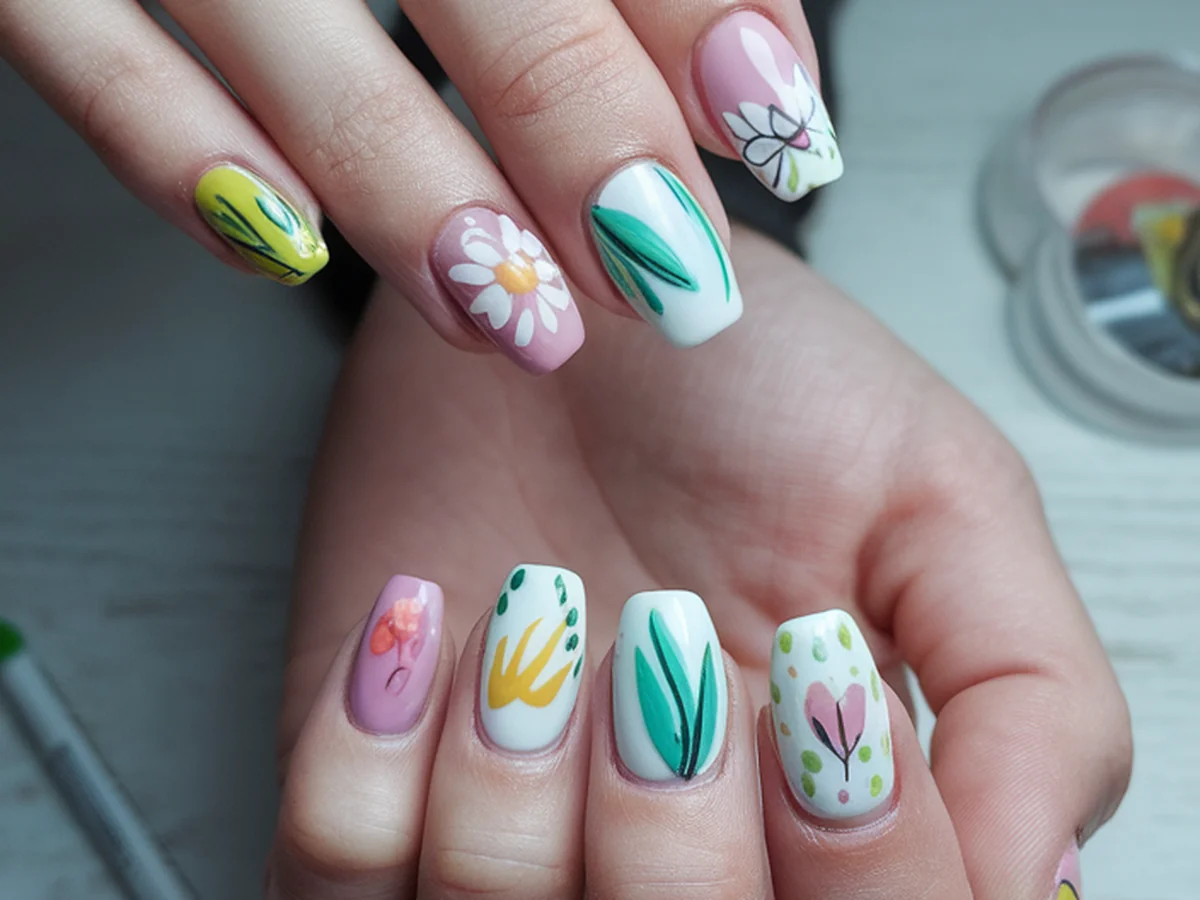
Floral Nail Art: Capturing the Essence of Spring
One of the most delightful ways to celebrate spring is through floral nail art. Flowers are a quintessential symbol of the season, and painting them on your nails can instantly uplift your mood. Start by choosing a few simple flower designs, such as daisies or tulips, which are easy to create even for beginners.
To achieve detailed floral patterns, a dotting tool can be your best friend. Dip the tool in your chosen polish and start by creating a central dot for the flower. Then, add petals around it by making smaller dots in a circular pattern. You can use different colors to create a more vibrant look, mixing shades like pink, yellow, and white.
For added flair, consider making one or two accent nails featuring a more intricate floral design while keeping the rest of your nails in a solid color. This contrast can make your floral art stand out beautifully. Remember, the key to successful floral nail art is practice—don’t be afraid to experiment with shapes and shades!
Pastel Ombre Nails: A Soft Spring Palette
Pastel ombre nails are another fantastic way to embrace the soft colors of spring. This gradient effect creates a beautiful transition between colors that can be both soothing and stylish. To achieve this look, you’ll need a few pastel polishes and a makeup sponge.
Start by applying a base coat to your nails. Once dry, paint a stripe of your first color onto the sponge and then a stripe of a second color right next to it. Dab the sponge onto your nails, gently blending the two colors together as you go. Repeat this process until you achieve the desired ombre effect.
Some lovely color combinations for spring include mint green and lavender or peach and soft pink. For an extra touch of sparkle, add a light coat of glitter polish over your ombre nails to give them a shimmering finish. This simple yet stunning design is perfect for any spring occasion.
Geometric Patterns: Modern Spring Designs
Geometric patterns have taken the nail art world by storm, and they can add a modern touch to your spring manicure. The clean lines and shapes often reflect the freshness of the season, making them a popular choice. You can create simple geometric designs with just a few colors and some tape for precision.
Start by painting your nails with a base color of your choice. Once dry, use nail tape to create shapes like triangles or stripes. Apply a contrasting color over the exposed areas, then carefully remove the tape to reveal clean lines. This technique allows for easy customization, so feel free to mix and match colors that reflect the vibrancy of spring.
Consider color schemes like bright yellows, greens, and blues to evoke the essence of the season. The beauty of geometric nail art lies in its versatility—whether you prefer minimalistic designs or bold statements, you can easily adapt this style to fit your personality.
Nature-Inspired Nail Art: Leaves and Vines
If you’re drawn to the beauty of nature, why not bring that inspiration to your nails with leaf and vine designs? These motifs are perfect for spring, as they echo the lush greenery that comes with the season. There are several techniques you can use to create these designs.
Begin by painting your nails a neutral base color, allowing the leaf and vine designs to pop. You can use a fine brush or a dotting tool to create leaf shapes. For vines, draw a thin line and add small leaves along the path. To mimic nature’s palette, opt for greens, browns, and even some soft floral colors to make your designs more vibrant.
Incorporating negative space into your designs can also yield a modern and chic look. Instead of filling in the entire nail, leave parts of your base color visible to create a stylish contrast. Combining leaf designs with other patterns, such as stripes or dots, can create an eye-catching and unique manicure.
Rainbow Nails: Celebrate the Colorfulness of Spring
Spring is synonymous with vibrant colors, and what better way to celebrate than with rainbow nails? This playful design can bring joy to your fingertips and is perfect for those who love a burst of color. Creating a rainbow gradient can be a fun project that allows you to experiment with blending techniques.
To achieve the rainbow look, start with a base coat and select your favorite rainbow colors. Using a makeup sponge, apply stripes of each color side by side. Dab the sponge onto your nails, blending the colors together as you go. For a whimsical touch, consider adding cloud or sun motifs with white polish to enhance the overall effect.
Rainbow nails are incredibly versatile and can be worn for any occasion. Whether you want to brighten up your everyday look or add a festive touch to a spring celebration, these vibrant nails are sure to make a statement.
Cute Animal Designs: Spring Creatures on Your Nails
Spring is also a time for adorable creatures to emerge, and you can celebrate them with cute animal nail designs. From bunnies and chicks to butterflies, there are countless options to choose from. These designs can bring a cheerful vibe to your nails and are perfect for those who love to express their playful side.
For intricate animal designs, start by painting your nails with a base color that complements your chosen animal. For example, a light brown for a bunny or soft yellow for a chick. Use a fine brush to paint tiny details, such as facial features or patterns. If you’re not confident in your painting skills, consider using nail stickers for an easier application.
When selecting color palettes, think about the natural colors of each animal. Pastel tones can work wonderfully for a soft look, while brighter colors can create a more vibrant and fun effect. These charming designs can be a wonderful conversation starter and a delightful way to welcome spring.
Tips for Maintaining Your DIY Nail Art
Creating beautiful DIY nail art is just the first step; maintaining your designs is equally important. Here are some best practices to ensure your nails stay looking fresh and chip-free for as long as possible.
Before applying nail polish, make sure your nails are clean and dry. A good base coat not only protects your nails but also helps the polish adhere better. After your nail art is complete, always finish with a top coat to seal your designs and add shine. This layer can significantly extend the life of your manicure.
To avoid chipping, try to avoid using your nails as tools and be gentle with them. If you do notice a chip, don’t panic! You can quickly touch it up with a bit of the same polish and a small brush. Additionally, keeping your nails moisturized and your cuticles healthy can help maintain their appearance. Regularly apply cuticle oil to keep your nails looking their best.
Conclusion
DIY spring nail art is a wonderful way to express your creativity and embrace the joy of the season. By exploring various designs—from floral patterns to playful animal motifs—you can personalize your nails in a way that reflects your unique style. The therapeutic process of painting your nails can be incredibly rewarding, making it not just a beauty routine but also a form of self-expression.
I encourage you to try out these ideas and adapt them to your taste. Don’t hesitate to share your creations with friends or on social media; it’s always fun to inspire others! Remember, engaging in DIY projects allows you to connect with your creative side, bringing a sense of fulfillment and joy to your day.
Frequently Asked Questions
What are the best nail polish colors for spring?
Spring is all about soft, fresh colors that reflect the blooming nature around us. Pastels such as light pink, mint green, lavender, and soft yellow are excellent choices. You can also incorporate vibrant floral shades like coral and peach to bring a lively touch to your spring nail art. Mixing these colors can create a beautiful palette that captures the essence of the season.
How can I make my DIY nail art last longer?
To prolong the lifespan of your nail art, start with a clean nail surface and always apply a base coat before your polish. Finish with a top coat to seal your design. Additionally, avoid using your nails as tools and keep them moisturized to prevent chipping. Regular touch-ups can also help maintain your manicure, ensuring it looks fresh for longer.
Are there any easy designs for beginners?
Absolutely! Some beginner-friendly designs include polka dots, stripes, and simple floral patterns. Using tools like dotting tools and tape can help you create clean, easy designs. Start with one or two colors and gradually experiment with more intricate designs as you gain confidence in your skills.
Can I use regular nail polish for nail art?
Yes, regular nail polish works perfectly for nail art! However, using nail polish specifically designed for nail art can provide more precision and control. These polishes often have thinner brushes or pens to help you create intricate designs easily. Regardless, regular nail polish can still yield beautiful results!
What should I do if I make a mistake while painting my nails?
Mistakes are a common part of the nail art process, but they can often be fixed easily! If you smudge or spill polish, use a cotton swab dipped in nail polish remover to clean up the area. For larger mistakes, wait for the polish to dry and paint over it with the base color. Remember, practice makes perfect, so don’t be discouraged!